The Bridge to Your Users: Mastering Forms and Inputs
Have you ever considered how you actually “talk” to the internet? When you sign up for a newsletter, buy a new pair of shoes, or post a status update, you aren’t just clicking buttons; you are engaging in a sophisticated dialogue. This dialogue is made possible by forms and inputs.
In the early days of the web, forms were clunky and purely functional. Today, they are the heartbeat of the modern internet. They are the gateways to social media, the checkout counters of e-commerce, and the search bars that navigate the world’s information.
In this detailed guide, we are going to explore the world of forms and inputs. We’ll break down the technical components that make them work, explore the psychological triggers that make them easy to use, and look at the security measures that keep your users’ data safe. Whether you are building your first “Contact Us” page or designing a complex multi-step application, mastering these building blocks is essential for your success as a developer.
What are Forms and Inputs?
Let’s start with a clear, foundational definition.
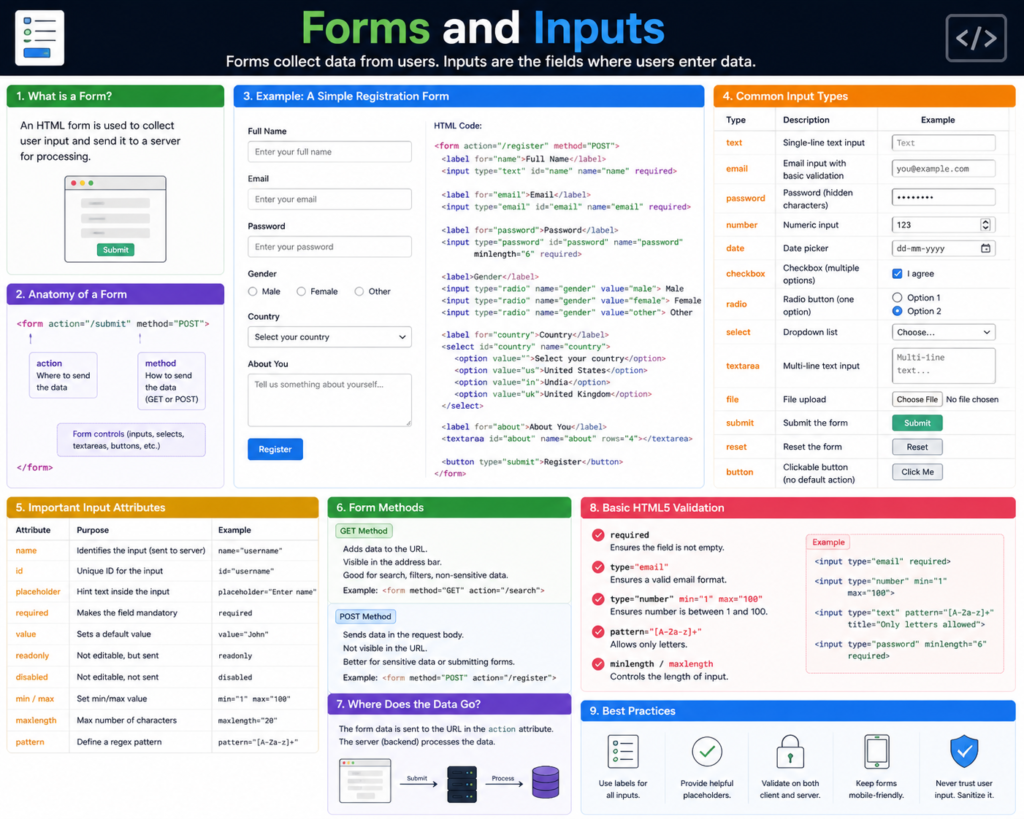
What is an HTML Form?
In web development, a form is a section of a document that contains interactive controls. It acts as a container that collects user data and sends it to a server for processing. Think of a form as an envelope. It holds all the relevant pieces of information together so they can be delivered to the right destination.
What are Inputs?
If the form is the envelope, inputs are the specific lines on the letter inside. An input is an individual element—like a text field, a checkbox, or a dropdown menu—that allows a user to enter or select data.
Each input is designed for a specific type of information. You wouldn’t use a “Yes/No” checkbox for a user’s home address, just as you wouldn’t use a giant text box for a simple “Agree to Terms” confirmation. Choosing the right input type is the first step toward a great user experience.
Why are Forms and Inputs Important?
You might think of forms as a secondary detail, but they are often the most critical part of a website’s business logic.
1. Data Collection
Without forms, the internet would be a “read-only” environment. You could consume content, but you couldn’t contribute to it. Forms allow businesses to collect leads, register users, and gather feedback.
2. User Engagement
A well-designed form encourages interaction. If a form is easy to fill out, users are more likely to complete a purchase or sign up for a service. On the flip side, a confusing or broken form is the number one reason for “cart abandonment” in e-commerce.
3. Data Integrity and Security
Forms are the front line of security. By using specific input types and validation rules, you ensure that the data entering your system is clean and safe. This protects your database from malicious attacks like SQL injection and ensures that an email address actually looks like an email address.
Core Concepts Explained: The Building Blocks of Interaction
To build effective forms and inputs, you need to understand the attributes and elements that define them.
1. The Tag and its Attributes
A form needs two primary pieces of information to function:
- Action: This tells the form where to send the data (usually a URL for a server-side script).
- Method: This tells the form how to send it.
- GET: Appends the data to the URL (good for search bars).
- POST: Sends data hidden in the body of the request (essential for passwords and sensitive info).
2. Labels: The Unsung Heroes
Every input must have a . Not only does this tell the user what to type, but it also makes your site accessible. Screen readers for visually impaired users rely on labels to explain what each box is for.
3. The Most Common Input Types
- Text: For names and short strings.
- Password: Masks the characters for security.
- Email: Automatically checks for an “@” and a domain.
- Number: Provides arrows to increment or decrement values.
- Checkbox: For “on/off” or multiple-choice selections.
- Radio: For selecting exactly one option from a group.
💡 Pro Tip: Use the placeholder attribute sparingly. It should provide a hint, not replace a label. Once the user starts typing, the placeholder vanishes, but the label stays visible!
Practical Examples: Building a Contact Form
Let’s look at how we combine these elements to create a professional, functional contact form.
The HTML Structure:
<form action="/submit-form" method="POST">
  <label for="full-name">Full Name:</label>
  <input type="text" id="full-name" name="user_name" required>

  <label for="user-email">Email Address:</label>
  <input type="email" id="user-email" name="user_email" required>

  <label for="message">Your Message:</label>
  <textarea id="message" name="user_message" rows="4"></textarea>

  <button type="submit">Send Message</button>
</form>
Why this works:
- ID and For: The id on the input matches the for on the label. This means if you click the label, the input becomes active.
- Required Attribute: This prevents the user from sending an empty form.
- Name Attribute: This is the “key” the server uses to identify the data. Without a name, the server won’t know which piece of text belongs to the “Full Name” field.
Common Mistakes to Avoid
Even expert developers can fall into “bad form” habits. Watch out for these:
- Missing Labels: Never assume the user knows what a blank box is for.
- Too Many Fields: Every extra field you add reduces the chance of someone completing the form. Only ask for what you strictly need.
- Generic Error Messages: If a user makes a mistake, don’t just say “Invalid Input.” Say “Please enter a valid phone number including the area code.”
- Lack of Mobile Optimization: Ensure your inputs are large enough to be tapped with a thumb. Avoid forcing users to zoom in to type.
- Ignoring the “Tab” Order: Users should be able to navigate your entire form using only the “Tab” key on their keyboard.
Pro Tips & Best Practices for High Conversion
If you want your forms and inputs to be world-class, follow these UX secrets:
- Inline Validation: Don’t wait until the user hits “Submit” to tell them they made a mistake. Use JavaScript to show a green checkmark or a red warning as they finish typing in a field.
- Logical Grouping: If a form is long, group related fields together (e.g., “Personal Info,” “Shipping Address,” “Payment Details”) using the and tags.
- Appropriate Input Masks: For phone numbers or credit cards, format the text automatically as the user types (e.g., adding dashes or spaces).
- Clear Call-to-Action (CTA): Don’t just use the word “Submit.” Use action-oriented words like “Get My Free Quote,” “Create My Account,” or “Join the Community.”
- Smart Defaults: If 90% of your users are from the United States, pre-select “United States” in the country dropdown to save them a click.
Real-World Use Cases
1. The E-commerce Checkout
A checkout form is a masterpiece of forms and inputs. It uses “Auto-complete” attributes so your browser can fill in your address instantly. It also uses sensitive type=”tel” inputs for mobile users so the number pad pops up instead of the full keyboard.
2. Multi-Step Signups
For complex apps like banking or insurance, developers use “Multi-step” forms. This breaks a 50-field form into five small pages. This reduces “cognitive load”—the feeling of being overwhelmed—and keeps the user moving forward.
3. Search and Filtering
On sites like Amazon or Airbnb, inputs are used as filters. Checkboxes for “Free Shipping,” range sliders for “Price,” and date pickers for “Check-in” are all specialized inputs that help users navigate massive amounts of data.
Mini Project: A Dynamic “Dark Mode” Toggle
Let’s use a checkbox input for something other than a standard form. We’ll create a simple toggle that changes the background color of a page.
The Plan:
- Create a checkbox input.
- Use CSS to style the page based on whether that checkbox is “checked.”
The Code:
<style>
  body { transition: 0.3s; }
  /* When the checkbox is checked, change the body color */
  body:has(#theme-toggle:checked) {
    background-color: #333;
    color: white;
  }
</style>

<label>
  <input type="checkbox" id="theme-toggle">
  Enable Dark Mode
</label>
This project shows that forms and inputs aren’t just for sending data to servers; they are powerful tools for controlling the user interface (UI) itself!
Frequently Asked Questions (FAQs)
1. What is the difference between a button and an input type=”submit”?
They both send the form, but the tag is much more flexible. It allows you to put HTML inside it (like an icon or an image), whereas the input tag can only display plain text. 2. How do I prevent spam in my forms? The most common way is using a “CAPTCHA” (like Google’s reCAPTCHA). You can also use “Honeypot” fields—hidden inputs that only bots can see. If the hidden field is filled out, the server knows the “user” is actually a robot. 3. Why is my form data appearing in the URL? This happens if you use method=”GET”. While this is fine for search results, it is a major security risk for passwords or personal info. Switch to method=”POST” for sensitive data. 4. Can I style inputs with CSS? Yes, but it can be tricky! Some inputs (like checkboxes and file uploaders) look different on every browser. Many developers hide the original input and build a “fake” one with CSS to ensure a consistent look. 5. What is “Form Validation”? Validation is the process of checking if the data is correct before sending it. You can do this in the browser (Client-side) for speed and on the server (Server-side) for security. Always do both. Conclusion: Crafting Better Conversations Forms and inputs are more than just technical necessities; they are the heart of user interaction. When you take the time to build a form that is accessible, fast, and easy to understand, you are showing respect for your user’s time and effort.
By mastering the various input types, implementing smart validation, and prioritizing accessibility, you move from being a coder who builds “pages” to an engineer who builds “experiences.” Every successful interaction on your website begins with a single input. Make sure yours are ready for the task.
Start practicing now! Go to your favorite website and try to identify which type of input they are using for different tasks. Does their search bar behave differently than their login field?
Check our next guide on “JavaScript Event Listeners” to learn how to make your forms react to users in real-time!