HTML Tags Explained: A Complete Professional Guide
1. Introduction
Every website you visit is built on a foundation of structured code, and at the core of that structure are HTML tags. Understanding how these tags work is essential for anyone interested in web development, whether you are a beginner taking your first steps or an intermediate developer refining your skills.
In this comprehensive guide on HTML Tags Explained, you will gain a clear understanding of how HTML tags function, why they are important, and how to use them effectively in real-world scenarios. The goal is not only to explain concepts but to help you think like a developer who writes clean, structured, and scalable code.
2. What is HTML Tags Explained?
Definition of HTML Tags
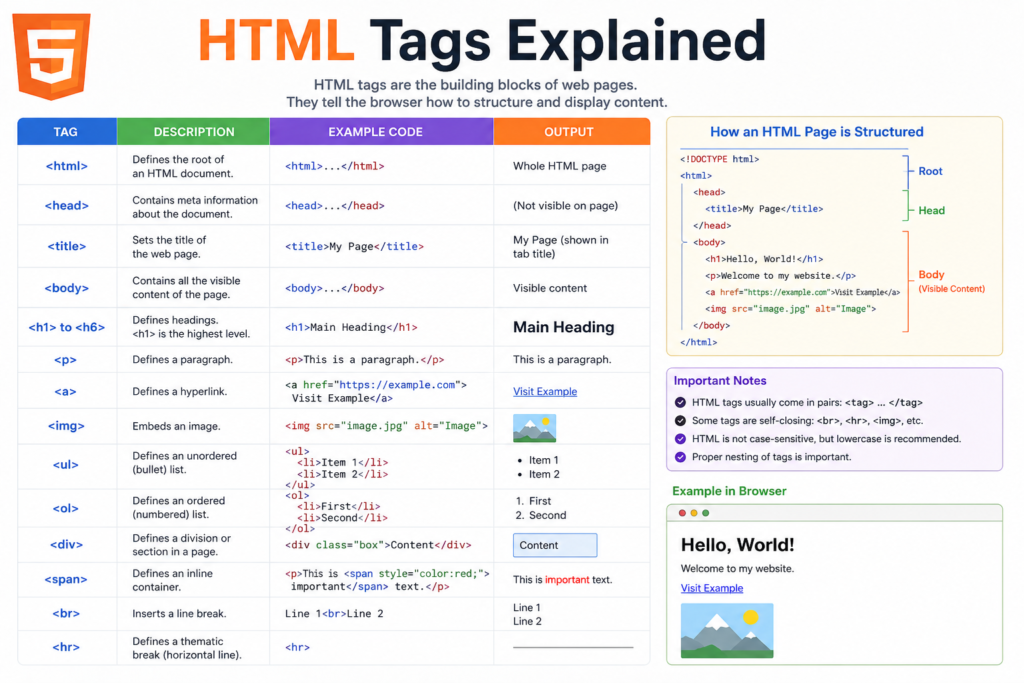
HTML stands for HyperText Markup Language, and it is the standard language used to create web pages.
An HTML tag is a markup element that defines the structure and meaning of content on a webpage. Browsers interpret these tags and render the content accordingly.
Basic Syntax
<tagname>Content</tagname>
Example
<p>This is a paragraph.</p>
In this example:
<p>is the opening tag</p>is the closing tag- The text inside is the content
Most HTML tags work in pairs, forming what is known as an HTML element.
3. Why Are HTML Tags Important?
HTML tags are not just a technical requirement; they are fundamental to how the web functions.
Key Reasons:
- Content Structure: Tags organize content into headings, paragraphs, lists, and sections
- Browser Interpretation: They tell browsers how to display content correctly
- Search Engine Optimization (SEO): Proper tag usage improves visibility in search engines
- Accessibility: Tags help assistive technologies understand and navigate content
Without HTML tags, web pages would lack hierarchy, readability, and usability.
4. Core Concepts Explained
4.1 Tags vs Elements
- A tag is the markup itself (
<h1>) - An element includes the tag and its content (
<h1>Title</h1>)
4.2 Nested Elements
HTML allows elements to be placed inside other elements:
<div>
  <p>This is a nested paragraph.</p>
</div>
Proper nesting is critical to ensure correct rendering.
4.3 Attributes
Attributes provide additional information about elements:
<a href="https://example.com">Visit Website</a>
Here, href is an attribute that defines the destination of the link.
4.4 Self-Closing Tags
Some tags do not require a closing tag:
<img src="image.jpg" alt="Sample Image">
<br>
<hr>
These are known as void elements.
4.5 Block vs Inline Elements
- Block elements take full width (e.g.,
<div>,<p>) - Inline elements take only necessary space (e.g.,
<span>,<a>)
Understanding this distinction is essential for layout control.
5. Practical Examples
5.1 Headings
<h1>Main Heading</h1>
<h2>Subheading</h2>
<h3>Section Title</h3>
Headings establish a clear hierarchy.
5.2 Paragraphs
<p>This is a paragraph of text.</p>
5.3 Links
<a href="https://www.example.com">Visit Example</a>
5.4 Images
<img src="image.jpg" alt="Descriptive text">
The alt attribute improves accessibility and SEO.
5.5 Lists
Unordered List:
<ul>
  <li>Item One</li>
  <li>Item Two</li>
</ul>
Ordered List:
<ol>
  <li>Step One</li>
  <li>Step Two</li>
</ol>
5.6 Layout Elements
<div>
  <p>Content inside a container</p>
</div>

<span>Inline content</span>
5.7 Forms
<form>
  <input type="text" placeholder="Enter your name">
  <button type="submit">Submit</button>
</form>
Forms allow user interaction.
6. Common Mistakes to Avoid
1. Missing Closing Tags
Incorrect:
<p>This is incorrect
Correct:
<p>This is correct</p>
2. Improper Nesting
Incorrect:
<b><i>Text</b></i>
Correct:
<b><i>Text</i></b>
3. Overusing Generic Containers
Excessive use of <div> can reduce code clarity. Use semantic elements where possible.
4. Ignoring Accessibility
Failing to include attributes like alt or proper labels affects usability.
7. Pro Tips & Best Practices
Use Semantic HTML
Prefer meaningful tags:
<header>Website Header</header>
<section>Main Content</section>
<footer>Footer Content</footer>
Maintain Clean Code
- Use consistent indentation
- Avoid unnecessary nesting
- Write readable and organized markup
Optimize for SEO
- Use one
<h1>per page - Structure headings logically
- Include descriptive text
Validate Your Code
Use HTML validators to detect errors and improve quality.
8. Real-World Use Cases
HTML tags are applied in multiple contexts:
Websites
- Corporate sites
- Blogs
- E-commerce platforms
Web Applications
- Dashboards
- Content management systems
Educational Platforms
- Online courses
- Documentation sites
9. Mini Project: Build a Simple Profile Page
<!DOCTYPE html>
<html>
<head>
  <title>My Profile</title>
</head>
<body>

  <h1>John Doe</h1>
  <p>Web Developer in Training</p>

  <img src="profile.jpg" alt="Profile Photo">

  <h2>Skills</h2>
  <ul>
    <li>HTML</li>
    <li>CSS</li>
  </ul>

  <h2>Contact</h2>
  <a href="https://github.com">GitHub Profile</a>

</body>
</html>
This project demonstrates how multiple HTML tags work together to form a complete page.
10. FAQs
1. What are HTML tags used for?
They define the structure and presentation of content on a webpage.
2. Are all HTML tags paired?
No. Some are self-closing, such as <img> and <br>.
3. What is semantic HTML?
It refers to tags that clearly describe their purpose, such as <article> and <footer>.
4. Do HTML tags impact SEO?
Yes. Proper use of headings and structure improves search engine ranking.
5. What is the difference between block and inline elements?
Block elements occupy full width, while inline elements only take necessary space.
6. Can HTML work without CSS?
Yes, but the page will lack styling and visual appeal.
11. Conclusion
Understanding HTML Tags Explained is a fundamental step toward mastering web development. These tags provide the structure, meaning, and organization that every website relies on.
By learning how to use HTML tags correctly, you are building a strong foundation for more advanced topics such as CSS, JavaScript, and modern frameworks.
The most effective way to improve is through consistent practice. Start by creating simple pages, experiment with different tags, and gradually move toward more complex layouts.
Call to Action
Begin applying what you have learned by building your own web pages. Practice daily, refine your code, and continue exploring more advanced topics in frontend development.