The Developer’s Time Machine: Master Git Commands Basics
Have you ever spent hours working on a coding project, made a “tiny” change to fix a bug, and suddenly realized your entire application was broken? You hit “Undo” repeatedly, but it’s too late—the working version is gone forever. We’ve all been there, and that sinking feeling in your stomach is exactly why Git was created.
Learning Git commands basics is like gaining the ability to save your progress in a video game right before a difficult boss fight. It’s your safety net, your collaboration engine, and your professional portfolio all rolled into one.
In this comprehensive guide, we aren’t just going to list commands; we are going to understand the philosophy behind version control. You will learn how to track your history, work seamlessly with other developers, and navigate the most essential Git commands basics with total confidence. Let’s turn that “Oops!” into a “Fixed it!”
What is Git? (The Universal Undo Button)
Before we dive into the syntax, let’s define the beast. Git is a Distributed Version Control System (DVCS).
In plain English? It’s a tool that tracks every single change you make to your files. Unlike a simple “Save” button that overwrites your old work, Git keeps a detailed ledger of what was added, removed, or modified. Because it’s “distributed,” every developer on a team has a full copy of the project’s history on their own machine.
The Video Game Analogy
Think of your project as an RPG game.
- Working Directory: This is your current gameplay—the live action.
- Staging Area: This is like a “Save Game?” confirmation screen. You’ve decided which items/stats you want to keep.
- Repository (Commit): This is the actual save file on your memory card. You can go back to this specific point in time whenever you want.
Why are Git Commands Basics Important?
Why bother with a command line when you could just copy and paste folders named project_final_v1, project_final_v2_REALLY_FINAL?
1. Collaboration without Chaos
Imagine five people trying to edit the same Word document at once. It would be a nightmare of overwritten sentences. Git allows multiple developers to work on the same codebase simultaneously through “branching,” merging their work together only when it’s ready.
2. Fearless Experimentation
Want to try a crazy new feature that might break everything? With Git commands basics, you can create a “branch,” try it out, and if it fails, simply delete the branch and return to your stable code as if nothing ever happened.
3. Career Requirement
If you want to work in tech, Git is not optional. It is the industry standard. Whether you use GitHub, GitLab, or Bitbucket, they all rely on the same core Git logic.
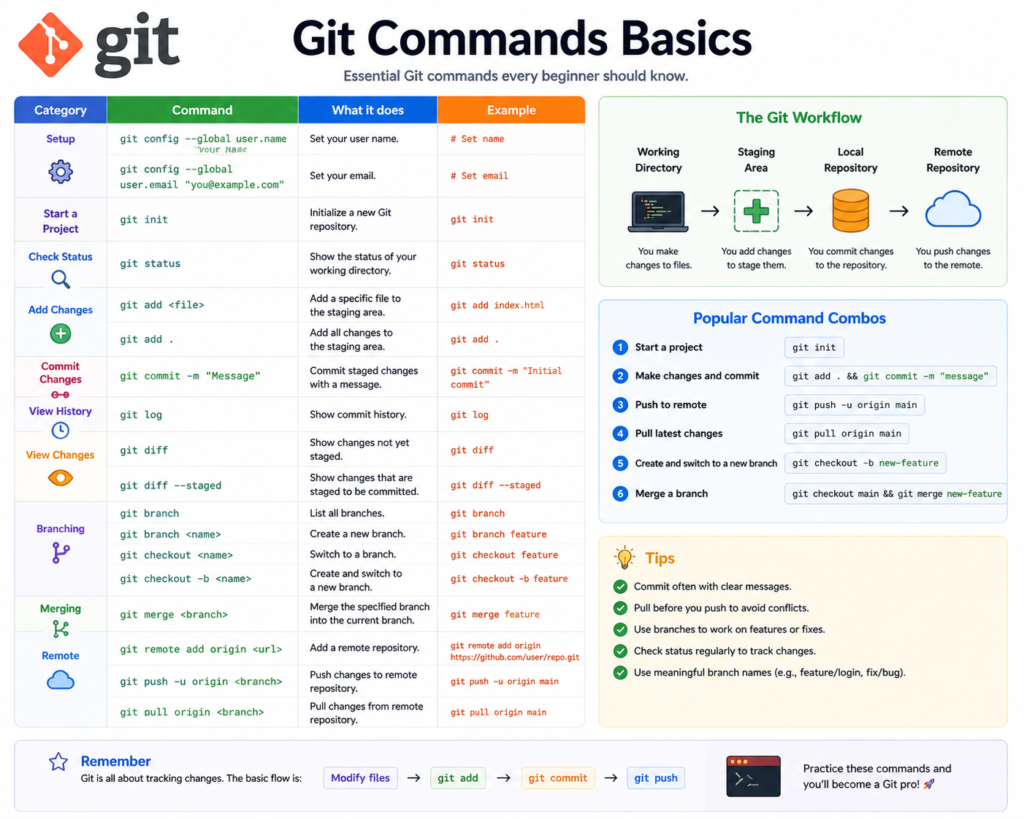
Core Concepts Explained: The 3 Pillars of Git
To understand Git commands basics, you must understand the “Three Stages” of a file’s life in a Git project.
1. The Working Directory
This is where your actual files live on your computer. You are actively editing, deleting, and adding code here. Git sees these files but hasn’t “tracked” the changes yet.
2. The Staging Area (The Index)
This is a middle ground. You’ve finished a specific task (like fixing a typo) and you want to tell Git, “Hey, include this change in the next snapshot.” You “add” files here.
3. The Repository (The Commit)
When you “commit,” Git takes a snapshot of everything in the staging area and stores it forever in the project’s history. Each commit gets a unique ID (a SHA-1 hash), allowing you to identify exactly who changed what and when.
Essential Git Commands Basics: Step-by-Step
Let’s walk through a typical day in the life of a developer using Git.
Setting Up Your Identity
Before you start, Git needs to know who you are so it can label your saves.
git config --global user.name "Your Name"
git config --global user.email "yourname@example.com"
1. Starting a Project: git init
To turn a boring folder into a Git masterpiece, navigate to it in your terminal and type:
git initThis creates a hidden .git folder. This is where the “Time Machine” lives.
2. Checking the Status: git status
This is the command you will use the most. It tells you which files have changed and what stage they are in.
git status3. Staging Changes: git add
Finished a feature? Put it in the staging area.
- To add a specific file: git add index.html
- To add everything: git add .
4. Saving the Snapshot: git commit
Now, lock those changes into history with a descriptive message.
git commit -m "Fix: correct the navigation bar alignment"💡 Pro Tip: Keep your commit messages in the “imperative” mood. Instead of “I fixed the bug,” use “Fix the bug.” It’s a standard industry convention that makes history easier to read!
5. Connecting to the Cloud: git remote
To share your code on GitHub, you need to link your local folder to a web address.
git remote add origin https://github.com/youruser/yourproject.git6. Sending Your Code: git push
Ready for the world to see? Push your commits to the remote server.
git push -u origin mainBranching and Merging: The Intermediate Edge
Once you master the Git commands basics above, you need to understand branching. Branching is like creating a parallel universe.
Creating a New Branch
git checkout -b feature-dark-modeNow, you can edit code without affecting the “main” version that users see.
Switching Back
git checkout mainMerging Changes
Once your feature is perfect, you bring it back into the main universe:
git merge feature-dark-modeCommon Mistakes to Avoid
Even pros mess up their Git history occasionally. Here’s how to stay out of trouble:
1. Committing Too Much at Once
Don’t work for 8 hours and then make one giant commit called “did work.” If something breaks, you won’t know which specific line caused it.
- The Fix: Commit early and often. Each commit should represent one logical change.
2. Forgetting to Pull Before You Push
If you are working with a team, someone else might have updated the code while you were working.
- The Fix: Always run git pull before you start your day to make sure you have the latest version.
3. Committing Sensitive Data
Never, ever commit passwords, API keys, or personal data.
- The Fix: Use a .gitignore file to tell Git which files to ignore (like .env or node_modules).
Pro Tips & Best Practices
- Learn to Read the Log: Use git log –oneline to see a beautiful, condensed history of your project.
- The “A-A-C” Rhythm: Develop a habit. Add, And then Commit.
- Use Descriptive Names: feature/login-fix is a much better branch name than test1.
- The Git Stash: If you aren’t ready to commit but need to switch branches quickly, use git stash to temporarily “hide” your changes in a secret drawer. You can bring them back later with git stash pop.
Real-World Use Cases
1. The Freelance Web Developer
A freelancer working on a client site uses Git to show progress. If the client says, “Actually, I liked the version from two weeks ago better,” the developer can simply revert the code to that specific commit in seconds.
2. Open Source Contributions
Thousands of strangers work on the Linux kernel or VS Code simultaneously. They use Git to submit “Pull Requests”—proposed changes that the project maintainers can review and merge.
3. Large Scale Enterprise
Companies like Facebook (Meta) use Git (or similar systems) to manage millions of lines of code. They use automated “pipelines” that run tests every time someone pushes code to ensure the site doesn’t crash.
Mini Project: Your First Git Workflow
Let’s try a hands-on exercise to solidify these Git commands basics.
Task: Create a “Hello World” repository.
- Create a folder: mkdir my-git-test and enter it cd my-git-test.
- Initialize: git init.
- Create a file: echo “Hello Git” > hello.txt.
- Check Status: git status (Notice it’s red/untracked).
- Stage it: git add hello.txt.
- Commit it: git commit -m “Initial commit: add hello text”.
- Modify it: Change the text in hello.txt to “Hello Git is awesome!”.
- See the difference: git diff (This shows you exactly what changed).
- Commit the update: git add . and git commit -m “Update: make message more excited”.
- View History: git log.
Congratulations! You just performed a professional version control workflow.
Frequently Asked Questions (FAQs)
1. What is the difference between Git and GitHub?
Git is the tool (the engine). GitHub is the website that hosts your Git repositories (the garage). You can use Git without GitHub, but you can’t use GitHub without Git.
2. How do I undo my last commit?
If you haven’t pushed it to the internet yet, you can use git reset –soft HEAD~1. This removes the commit but keeps your work in the staging area.
3. What is a “Merge Conflict”?
This happens when two people edit the same line of the same file. Git gets confused and asks you to choose which version to keep. Don’t panic! You just need to open the file, delete the conflict markers, and commit the “correct” version.
4. Is the command line better than a GUI (Visual Interface)?
While apps like GitHub Desktop or GitKraken are great, learning the command line gives you a deeper understanding of how Git actually works. Plus, if you ever have to work on a remote server, there won’t be a pretty interface!
5. Can I use Git for non-coding projects?
Yes! Many writers use Git for books, and designers use it for tracking asset versions. Git works for any text-based files.
Conclusion: Your Journey Has Just Begun
Mastering Git commands basics is a transformational moment for any developer. It moves you away from the fear of breaking things and into a mindset of professional, organized creation. You now have the power to travel through time, collaborate across the globe, and keep your code safe from the unexpected.
The commands might feel a bit alien at first, but with daily use, they will become “finger memory.” Don’t be afraid to make mistakes—that’s exactly what Git was designed to fix!
Start practicing now! Create a repository for your current project and make your first commit today.
Check our next guide on “Mastering GitHub Pull Requests” to learn how to contribute to the global coding community!